Traffic Serverの環境設定
Traffic Serverの環境設定は、ウェブ インターフェースを通じて更新できるシンプルなテキストベースのファイルを通じて行います。このファイルが、Traffic Serverの動作のあらゆる側面を管理しています。
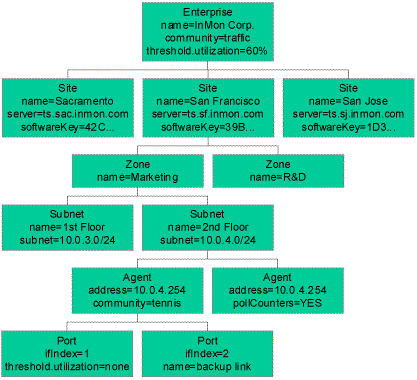
この環境設定ファイルでは、ネットワークを階層構造としてとらえます。
 図1 ネットワーク階層構造
この階層構造のエレメントは以下のとおりです。
- Enterprise(エンタープライズ) 1組織内の全てのサイトをひとまとめにした概念です。1つの環境設定ファイル内にエンタープライズを1つだけ定義することができます。
- Site(サイト) 1つのTraffic Serverが管理する全てのリソースをひとまとめにした概念です。一般的には、キャンパスや現場など、地理的ロケーションに相当します。
- Zone(ゾーン) サイトのリソースをいくつかの管理グループに分類したものです。これらのグループは物理的に分類する(たとえば、キャンパス上の各ビルに専用のゾーンを持たせる)ことも、組織的に(たとえば、部署や企業体別に)分類することもできます。
- Subnet(サブネット) アドレスとマスクにより定義される、連続する複数のIPアドレスをひとまとめにした概念です。サブネットは、モニタの対象となる複数のデバイスを1つのグループにまとめるために使用されます。また、オートディスカバリ スイープ時にスイープするアドレスの範囲を指定するためにも使用されます。互いにオーバーラップするサブネットが別々のゾーンで定義されると、マッチするサブネットのうちアドレス範囲が最小のものがエージェント用のロケーションとして使用されます。
- Agent(エージェント) 管理対象となる個々のデバイス(スイッチあるいはルーター)を指定します。
- Port(ポート) デバイス上の個々のインターフェースです。
環境設定パラメータは、階層構造のどのレベルにも設定できます。パラメータ設定は階層構造に従って適用され、全体の設定よりも詳細の設定の方が優先されます。下の例では、図1に示すネットワーク階層構造について、このエンタープライズ用のデフォルトのSNMPコミュニティが“traffic”であると想定して定義しています。ある特定のスイッチ(“San Francisco”サイトの“Marketing”ゾーンにおける“2nd Floor”サブネット内のエージェント10.0.4.254)には“tennis”という別のコミュニティ文字列が定義されています。Agentに関連づけられているこの固有の設定の方が、Enterpriseのレベルで定義されている全般的な設定(“traffic”)よりも優先されます。
ほとんどの場合、AgentセクションおよびPortセクションは指定する必要がありません。Traffic Serverがエージェントおよびポートを自動的に見つけ、適切なSubnetの設定を適用します。
環境設定ファイルは、設定値を定義するだけでなく、アドレスおよびエージェントについての階層的命名ポリシーを確立します。この階層構造は、ネットワーク内をナビゲートして輻輳問題についてドリルダウンする際に使用されます(ドリルダウンして輻輳の原因を明らかにするを参照してください)。
一部のサブネットがアクティブにモニタされない場合でも、環境設定ファイルにはネットワーク内の全てのサブネットを定義しておくだけの価値があります。Traffic Serverはクエリ内でトラフィックにラベルを付ける際にゾーン名とサブネット名を使用します。ローカルのトラフィックとそれ以外のトラフィックの識別が鍵となるセキュリティ機能が正しく機能するためにも、完全に定義されているサブネット リストが頼りになります。
最初の環境設定ファイルを手早く作成する方法として、メインTraffic ServerページのQuick Configurationリンクが用意されています。このリンクによりフォームが提示されるので、そこに必要事項を入力してsubmitをクリックしてください。ウェブ ブラウザのFile > Save As...メニュー オプションを使用して、作成した環境設定ファイルのローカル コピーを保存してください。
; The following steps are required to install this configuration file:
;  1. Save this file as inmon.txt using your browser File > Save As command
;  2. Click on the Server and then Configure options on the Traffic Server menu
;  3. Click on the Browse button at the top of the page
;  4. Select the inmon.txt file you just saved.
;  5. Click on the Submit button.
;
; Traffic Server should begin to discover all the data sources on its
; local subnet. You can monitor its progress by clicking on the
; Performance menu. The Interfaces counter indicates the number of
; data sources discovered.
;
; Edit the inmon.txt file and repost it if you want to make configuration
; changes. See Help > Configuration for information.

[enterprise]
name = "InMon Corp."

community = "traffic"

samplingRate = 1000       ;default sampling rate
samplingRate.10 = 400     ; sampling rate for 10Mb/s links
samplingRate.100 = 800    ; sampling rate for 100Mb/s links
samplingRate.1000 = 2000  ; sampling rate for 1000Mb/s links

samplingEnabled = YES     ; turn on sampling on all devices
discoveryEnabled = YES    ; sweep all subnets for sampling devices
hubDiscoveryEnabled = YES ; include single port devices (hubs and probes)

threshold.frames = 50000/3         ; default, 5000 frames/s for 3 minutes.
threshold.frames.10 = 2000/10      ; 10Mb/s links, 2000 frames/s for 10 mins
threshold.frames.100 = 10000/5     ; 100Mb/s links, 10000 frames/s for 5 mins
threshold.frames.1000 = 50000/3    ; 1000Mb/s links, 50000 frames/s for 3 mins
threshold.utilization = 80%/10     ; default, 80% utilization for 10 mins
threshold.utilization.10 = 80%/10  ; 10Mb/s links, 80% utilization for 10 mins
threshold.utilization.100 = 80%/5  ; 100Mb/s links, 80% utilization for 5 mins
threshold.utilization.1000 = 60%/3 ; 1000Mb/s links, 60% utilization for 3 mins
threshold.broadcasts = 500         ; 500 broadcasts/s
threshold.multicasts = 500         ; 500 multicasts/s
threshold.errors = 2%/5            ; 2% of frames with errors for 5 mins

AutoDiscoveryHour = 3     ; perform discovery sweep at 3am each day

KeepActiveMinutes = 150   ; keep 150 minutes of real-time data
KeepHistoryDays = 14      ; keep a 14 day history of hourly data
KeepFreeMBytes = 50       ; keep 50 megabytes of free disc space

SLA.hours = 8-17         ; SLA reports between 8am and 6pm
SLA.days = 2-6           ; SLA reports Monday through Friday
SLA.utilization = 80%/10 ; SLA violation if port exceeds 80% for 10 min/day

ConsolidatePorts.UDP = 53,161,162,139
ConsolidatePorts.TCP = 80,8080,8088,139

[site]
  name = "San Francisco"
  managerName = "Peter Phaal"
  server= ts.sf.inmon.com
  softwareKey = 39B85B47FFFFFFFF0003FFFF7B72ADEC6413C46F3DCBB01E15DB85CA
  TraceEnabled = NO   ; disable automatic traceroute profiling
  DNS_Scope = 10.0.5.0/255.255.255.0  ; range of IP addresses for reverse DNS

  [zone]
    name = "server zone"

    [subnet]
      name = "server subnet"
      subnet = 10.0.5.0/255.255.255.0

    ; Add additional subnets to the server zone here
    ; [subnet]
    ; name = "new subnet"
    ; subnet = a.a.a.a/m.m.m.m

  ; Add additional zones here
  ; [zone]
  ; name = "new zone"

; Add additional sites here
; [site]
; name = "new site"
このファイルを編集して、サイトにゾーンやサブネットを追加することができます。満足な環境設定ができたら、ウェブ ブラウザを用いてこのファイルをアップロードできます。ウェブ ブラウザを用いてTraffic Serverに接続し、Server > Configureページを選択してください。Browse...ボタンをクリックし、たった今作成した環境設定ファイルを選択してください。Submitボタンをクリックし、環境設定を更新してください。
環境設定を変更する必要がある場合には、PC上の環境設定ファイルを編集してから、編集した環境設定ファイルを再度アップロードしてください。
| 関連トピック |
|